
The Action Sequences or xAction, as you like to call them, are getting less used, because we now have better alternatives as using kettle, anyhow they are still useful in some cases.
Quick introduction
From Action Sequences we can call transformations, so in reality, we can use an Action Sequence that calls a kettle transformation and to all the work (inclusive creating a session variable, but that was a bit slow on versions previous to 6.1. So, if we needed something that works faster, the alternative would be a Action Sequence.
If we want to do something simple as running a query and create a session variable based on the result of the query, we can just use the standard and available actions of an Action Sequence. But, when we need to create some more complex logic for a specific use case where we can’t do it just by using the “easy” actions of an Action Sequence, we can also write some custom code.
There is on action in a Action Sequence with the name “Custom”, that it’s very interesting. We can build our own Java code, pass parameters from the Action Sequence to the code we want to execute and get back the result of the execution of that custom code.
Creating custom Action Sequence
Let’s suppose we want to build a “Hello World!”. Well we can do it with the JavaScript step, but not if we wnat to set a session variable with a value that comes fom LDAP, based on the use that is logged in.
So, let’s pick the example of the “Hello World!”. The goal here would be, to get the user name that is logged in, apppend a hello message, and let the Action Sequence return the message to be displayed on the screen.
Since we won’t have the “JavaScript” action for every thing, I’ve used the “Custom” action to create a “Hello World!” example.
First we need to create the Action Sequence and add an input variable. We need the variable to have the name of the user that is logged in.
If using the Eclipse Plugin for Pentaho Action Sequences, you should be creating something as the image below.
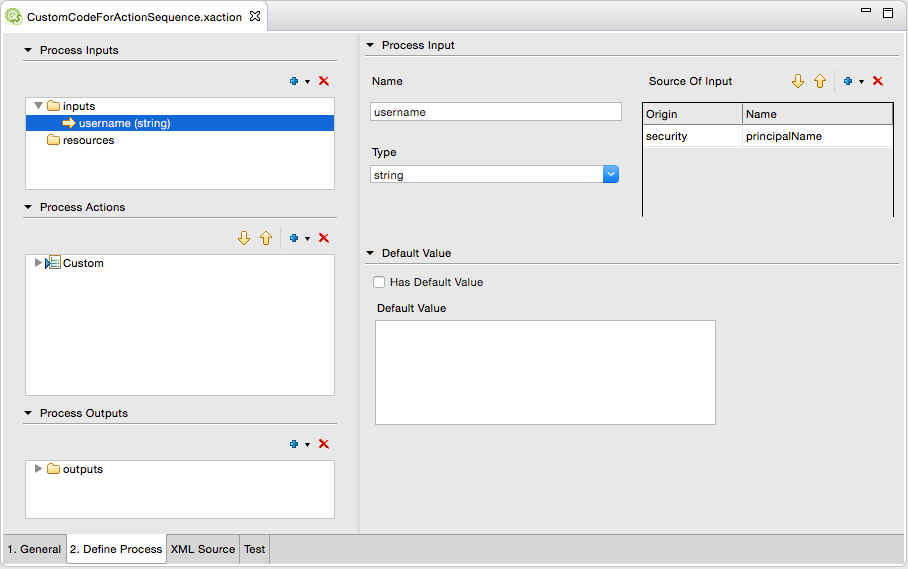
Else if using a text editor, you will need to add something as:
<inputs>
	<username type="string">
		<sources>
			<security>principalName</security>
		</sources>
	</username>
</inputs>
The next step is to add the custom action where we need to:
- Add a name to the action;
-
Add the name of the class that will make the call of our Java Class with the custom code. this will always be defined to be:
“org.pentaho.platform.engine.services.solution.PojoComponent”.
- Add the input variable with the value to be passed to the code;
- Add the output variable and the mapping to the Action Sequence variable to where the custom code will return the result.
The image below, show exactly those inputs and outputs as the name of the class that will make the call to our custom code.
If using a text editor you will need to write the following code:
<actions>
<action-definition>
<component-name>
org.pentaho.platform.engine.services.solution.PojoComponent
</component-name>
<action-type>Custom</action-type>
<action-inputs>
<name type="string" mapping="username"/>
</action-inputs>
<action-resources/>
<action-outputs>
<output type="string" mapping="outputmessage"/>
</action-outputs>
<component-definition>
<class>
com.github.mfgaspar.pentaho.Action Sequence.CustomCodeForActionSequence
</class>
</component-definition>
</action-definition>
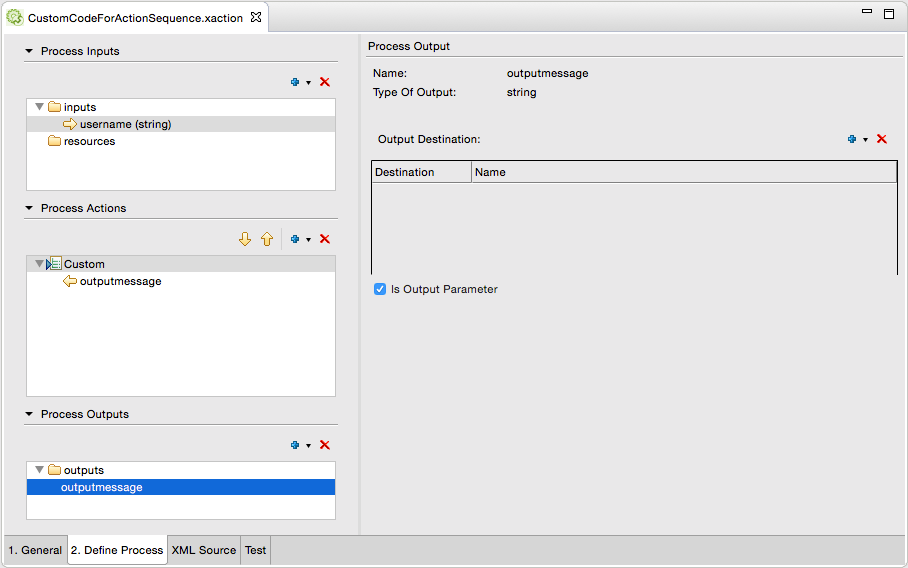
</actions> At last we need to have one output message to display on the screen, so we need to add an output to the Action Sequence. You can see an example on the image bellow.

If using a text editor the code will look like:
<outputs>
	<outputmessage type="string"/>
</outputs>
We already saw the code of the Action Sequence, but we haven’t saw the java code that will be executed. In the code below you will see that we need to reference 2 interfaces IAcceptsRuntimeInputs and IProducesRuntimeOutputs, so that we can accept inputs and write to outputs.
package com.github.mfgaspar.pentaho.Action Sequence;

import org.pentaho.platform.api.engine.IAcceptsRuntimeInputs;
import org.pentaho.platform.api.engine.IActionSequenceResource;
import org.pentaho.platform.api.engine.IProducesRuntimeOutputs;

import org.apache.commons.logging.Log;
import org.apache.commons.logging.LogFactory;

import java.util.HashMap;
import java.util.Map;

// This small sample accepts one name to whom we are sending back a message saying Hello
@SuppressWarnings( { "all" } )
public class CustomCodeForActionSequence implements IAcceptsRuntimeInputs, IProducesRuntimeOutputs {

	private static final Log logger = LogFactory.getLog( CustomCodeForActionSequence.class );

	private Map<String, Object> inputs = new HashMap<String, Object>();
	private Map<String, Object> outputs = new HashMap<String, Object>();
	private Map<String, IActionSequenceResource> resources;

	// Here you need to write the custom code you need to execute
	public boolean execute() {
		// Get the name from the inputs
		String username = (String) inputs.get( "name" );
		// Prepend "Hello, " to the name
		String outputMessage =  "Hello, " + username;
		// Set the hello message in the outputs to be returned to the Action Sequence
		this.outputs.put("output", outputMessage);
		// Log the message to the console, don't forget to include the class and/or change the log level
		logger.error(outputMessage);
		// Return the status of execution
		return true;
	}

	// Set the resources set in the Action Sequence
	public void setResources( Map<String, IActionSequenceResource> resources) {
		this.resources = resources;
	}

	// Set the inputs coming from the Action Sequence
	public void setInputs( Map<String, Object> inputs ) {
		this.inputs = inputs;
	}

	// Return outputs to the Action Sequence
	public Map<String, Object> getOutputs() {
		return outputs;
	}

}
There are 3 main functions we need to code:
- public void setInputs( Map<String, Object> inputs ) : That is executed at the begining to get the inpt variable values.
- public boolean execute(): With the code to be executed. At the time we already have the inputs and we can write to outputs. Here we are just prepending “Hello” to the name of the user coming from the inputs and write it to the output.
- public Map<String, Object> getOutputs(): Called at the end of the execution of the last function to return the message to the Action Sequence.
There is one other function we can use, if we are using resources on the Action Sequence and that function is:
- public void setResources( Map<String, IActionSequenceResource> resources): In case we want to use resources.
This Java code needs to be compiled and the jar file needs to be added to Pentaho webapp library, and that’s all.
At the end of the execution of the Action Sequence the output variable will have the message for the user, so it van be displayed on the screen.
So, you saw that this in another extension point in Pentaho. If we don’t have an action that performs what we need, then it’s time to get our hands on code.
Hope you can use kettle instead, but if not, just write a message in here, and let others knows what you did!